How to Set Blogger Post Feed Footer

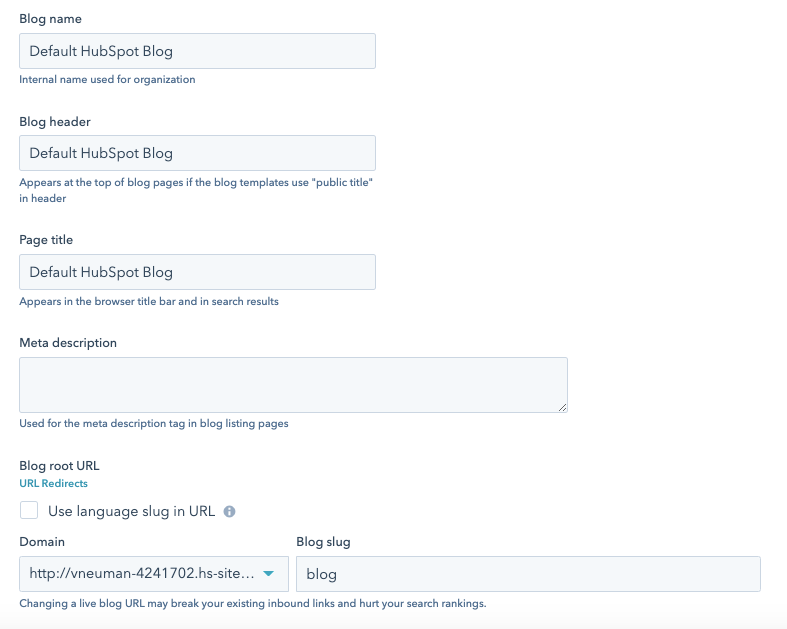
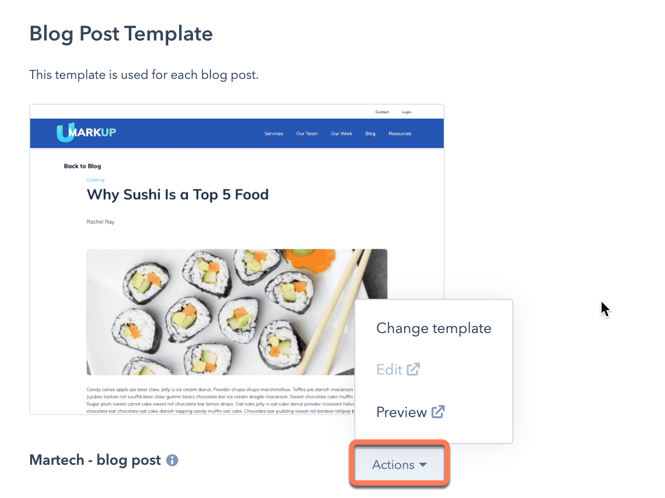
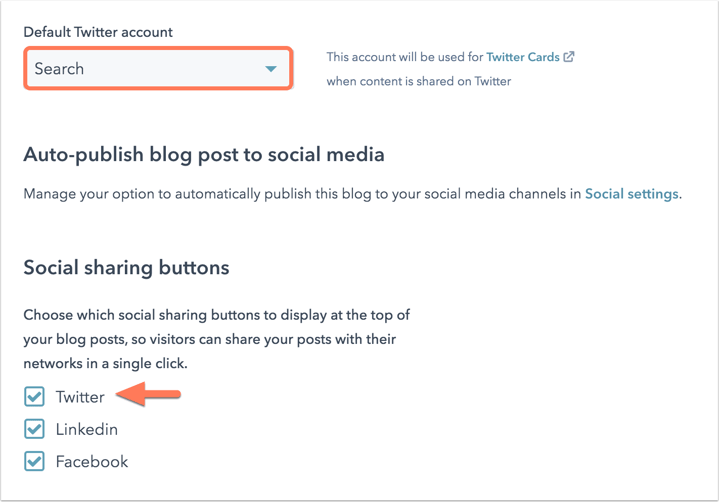
In blog settings, you can customize the template your blog is using, as well as its root URL, subscription email settings, date format, and more . If you're creating blog content in more than one language, learn how to create a multi-language blog.

Select, create, import, or delete a blog

  • In your HubSpot account, click the settings settings icon in the main navigation bar.
  • In the left sidebar menu, navigate to Website > Blog.
  • In the Current View section, click the first dropdown menu and select ablog.
    • To create a new blog, click the first dropdown menuand selectCreate new blog, then create a new blog.
    • To import a blog, click the first dropdown menu and selectImport blog. Learn more about different blog import methods.
  • To select a multi-language version of the blog, click the second dropdown menuand select alanguage. Learn more about working with multi-language blogs. In blog settings, you can select or create a blog with the dropdown menus at the top of the page.

select-blog-without-business-units

  • To delete a blog, click theOptions dropdown menu and selectDelete blog.
    • In the dialog box, enter the nameof the blog in the text field.
    • By default, the blog's subscription form, subscriber notification emails, subscription email lists, subscription contact property, and subscription type will also be deleted. To preserve any of these, clear the checkboxnext to it.
    • ClickYes, delete to finish deleting the blog.

Edit your general blog settings

On the General tab, you can create a new blog, delete a blog, or manage basic settings for your blog:

  • Blog name: the internal name of your blog. This name will not be visible to visitors.
  • Blog header: the external blog name that will display if your templates use the group.public_titleHubL variable.
  • Page title : the text that appears in the browser tab and in search engine results. It is recommended to keep the title below 70 characters.
  • Meta description: the summary that will appear in search engine results, in most cases.
  • Blog root URL:the URL of your blog listing page and the root URL of your blog posts.
    • Click the Domain dropdown menu and select a domain to host your blog on ( Marketing Hub Enterprise only)
    • To add a slug to the end of your root URL (e.g. /blog), enter the slug in theBlog slug field.

Please note: if you change the Blog root URL, redirects will automatically be created to redirect any published blog content to their new URLs. If there is no published blog content, redirects will not be created automatically.

  • Control audience access:control the privacy of your blog.
    • Public:your blog is public and can be accessed by anyone.
    • Private - Single sign on (SSO) required: your blog requires single sign-on authentication to access. Learn more about setting up single sign-on for private content.
    • Private - Registration required:your blog requires requires registration to access. Learn more about setting up member registration for private content.
  • Structured Data:add BlogPosting schema to your blog's posts. This will help your blog posts return in search results as article rich snippets and is recommended for all blog posts not already using custom schema. This setting is automatically turned on for blogs created after August 4, 2022, but off for blogs created before that time.

Please note: if you have manually added custom schema to your blog posts, turning on this setting is not recommended, as this will create two sets of schema.

manage-general-blog-settings

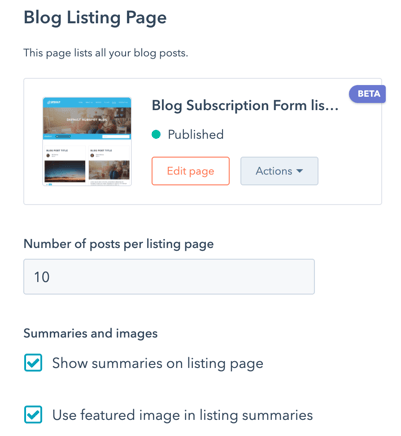
Select your blog templates

On the Templates tab, you can view or change the templates applied to your blog posts and blog listing page. You can also customize your listing page set-up and add custom HTML to your templates' header and footer.

  • In theBlog post section, click the Actionsdropdown menu to manage your blog post template:
    • SelectChange templateto choose a different template. On the template selection screen, select your new template,then clickDone. In the bottom left of your template settings, click Save.
    • Select Editto edit your template in the design manager. Learn more about editing a blog post or listing template.
    • SelectPreviewto see what your template looks like.

edit-blog-post-template

  • In the Blog listing pagesection, you edit a blog listing page or customize its settings:
    • ClickEdit page to open the listing page in the content editor.
    • Click theActions dropdown menu and select Preview to preview the page on different devices.
    • Click theActionsdropdown menu and selectDetails to view the listing page's performance data.
    • In the Number of posts per listing page field, enter the numberof posts you want to appear on your listing page. ClickSavein the bottom left to save your changes.
    • To display the content of blog posts up to theRead Moreseparator on your listing page, select the Show summaries on listing page checkbox. ClickSavein the bottom left to save your changes.
    • To display the featured images of your blog posts on your listing page, select the Use featured image in listing summaries checkbox. ClickSavein the bottom left to save your changes.

edit-settings-for-blog-listing-page

  • In theHeader HTML and Footer HTML sections, enter any custom HTML you want to apply to your blog post and listing templates. To apply different custom HTML to your blog post template, click Use custom header/footer HTML for blog posts. When you've added your custom HTML, click Save in the bottom left.

edit-blog-header-html-1

  • In theCSS and stylesheetssection, you can add a style sheet to your blog listing and blog post templates. You can also attach a stylesheet directly to the template.
    • Click Add stylesheet.
    • In the pop-up box, click the Choose a style sheet dropdown menu and select a style sheet, then click Add.
    • In the bottom left of your template settings, clickSave.

Manage your blog subscriptions

On the Subscriptions tab, you can turn on or off the different frequencies of email subscription notifications: Instant, Daily, Weekly, and Monthly. You can also create, edit, and delete blog notification emails for each frequency and customize RSS feed settings. Learn more about setting up blog subscription emails.

  • In the Email Link column, click Editto edit a blog notification email or click Deleteto remove it.
  • To turn on notification emails for a frequency, click to toggle the Sendswitch on. A frequency must have anEmail StatusofComplete before its emails can be turned on.

blog-subscriptions-settings

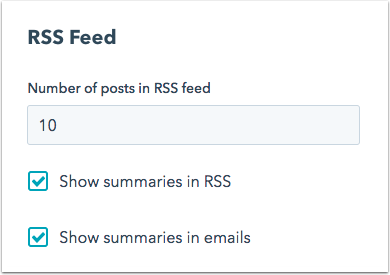
In the RSS Feed section of your settings, you can customize the way your blog posts appear in your RSS feed and in the post feed in your blog notification emails.
  • Enter the number of blog posts features in each blog notification email. 10 is the default number of posts.
  • Select theShow summaries in RSScheckbox to show a preview of your blog post content in your RSS feed.
  • Select theShow summaries in emails checkbox to show a preview of your blog post content in your RSS emails.

blog-rss-settings

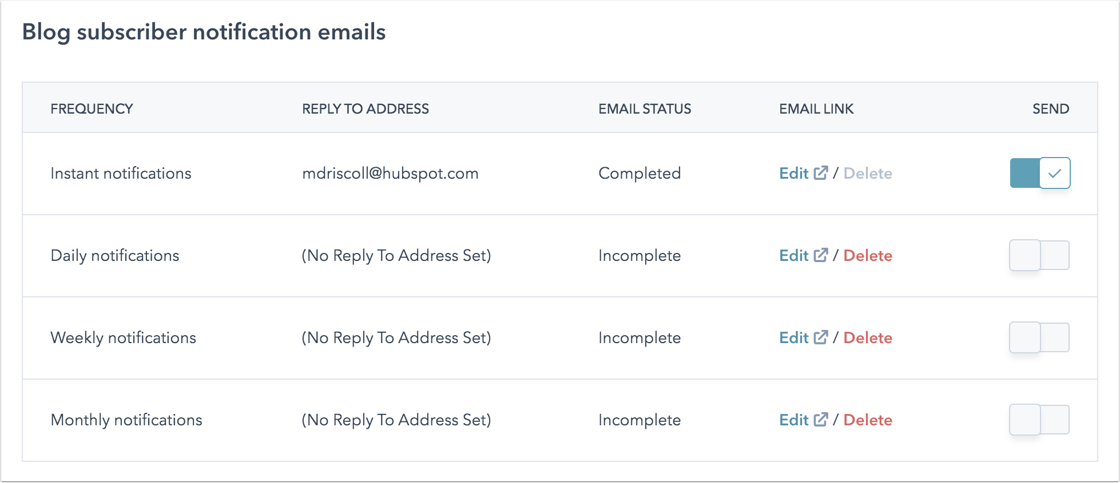
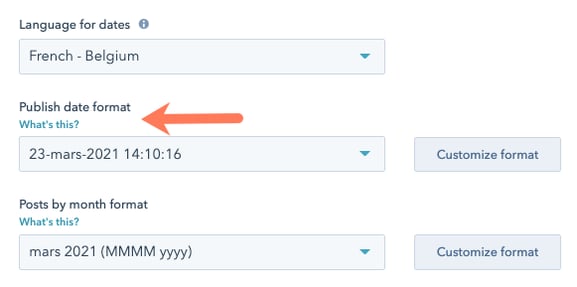
Set your blog's date formats

On the Date Formats tab, you can select the language and format for the dates on your blog posts and blog listing page. This is separate from setting the language for a multi-language blog.

  • To set a language for your dates, click the Language for dates dropdown menu and select a l anguage .  This will determine the available formats in the other dropdown menus. In the bottom left, click Save.

  • To customize the date format for the publish dates on your blog posts and listing page, click the Publish date format dropdown menu and select a date format for your blog post publish dates. In the bottom left, click Save.
  • To customize the date format for the Posts by month section of your listing page, click the Posts by month format dropdown menu and choose a date format. In the bottom left, click Save.
  • To create a custom date format:
    • Click What's this? to review the guidelines for using Locale Data Markup Language.
    • ClickCustomize formatand enter yourcustom date format.ClickCreate date format.
    • In the bottom left of your date format settings, clickSave.

edit-date-formats

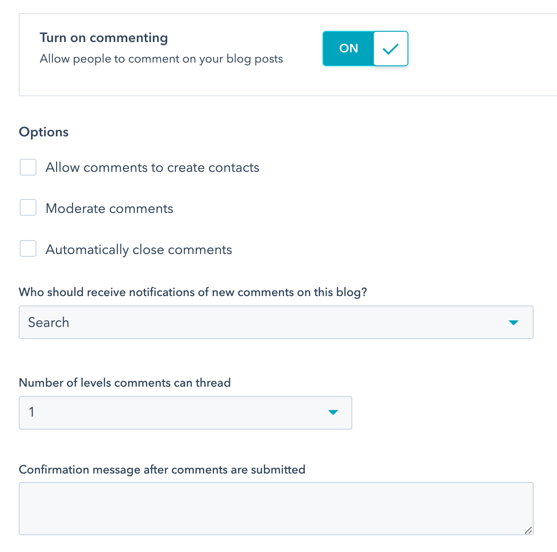
Edit your comments settings

On the Comments tab, you can manage blog comment notifications, moderator settings, and more. Learn more about configuring your blog comment options.

  • To allow visitors to leave comments on your blog, click to toggle the Turn on commenting switch on.
  • To add visitors who comment on your blog to your contacts database, select the Allow comments to create contacts checkbox.
  • To require approval by your team before comments are published, select the Moderate comments checkbox.
  • To select users who will receive notifications to review blog comments, click the Who should receive notifications of new comments on this blog? dropdown menu and selectusers.
  • To customize how many levels of comments can be threaded, click the Number of levels comments can thread dropdown menu and select a number of levels. The more levels added here, the more layers of replies visitors can leave on existing comments.
  • To show visitors a message after they leave a comment, enter amessagein theConfirmation message after comments are submitted text field.

edit-comment-settings

Edit your social sharing settings

On theSocial Sharingtab, set which social accounts appear in your blog's social sharing module. There will be a counter for each social media sharing icon that shows the number of times your blog post was shared on that network .

  • To set a Twitter handle for blog posts shared via Twitter Cards, click the Default Twitter account dropdown menu and select a Twitter account. Learn more about connecting a Twitter account to HubSpot.
  • To include a social media sharing icon on your blog, select the social sharing button checkbox next to the associated social network.

Please note: social sharing buttons are supported in default blog templates or templates with specific HubL variables. Learn more in our developer documentation.

blog-social-settings

Manage Google AMP

On theGoogle AMPtab, you can turn on Google Accelerated Mobile Pages, a mobile-specific format that loads content quickly.

  • To turn on Google AMP, click to toggle theTurn on Google AMP formatted pages toggle on.
  • Customize the appearance of your logo, header, and body text. Learn more about Google's recommendations for AMP formatting.
  • In the bottom left, clickSave.

Blog Account Settings

lofgrenliverit.blogspot.com

Source: https://knowledge.hubspot.com/blog/manage-your-blog-template-and-settings

0 Response to "How to Set Blogger Post Feed Footer"

Post a Comment

Iklan Atas Artikel

Iklan Tengah Artikel 1

Iklan Tengah Artikel 2

Iklan Bawah Artikel